Blog

How to setup your first chat bot

With chatmybot.com you can automate your customer service by setting up your chatbot to answer most common questions about your services or products. You can lead the customer to buy a specific product and much more. Even order statuses can be answered by chatbot, check how to set it up.

Step 1

After creating an account you will be provided with the default conversation scenario, which you can edit to adjust it to your needs

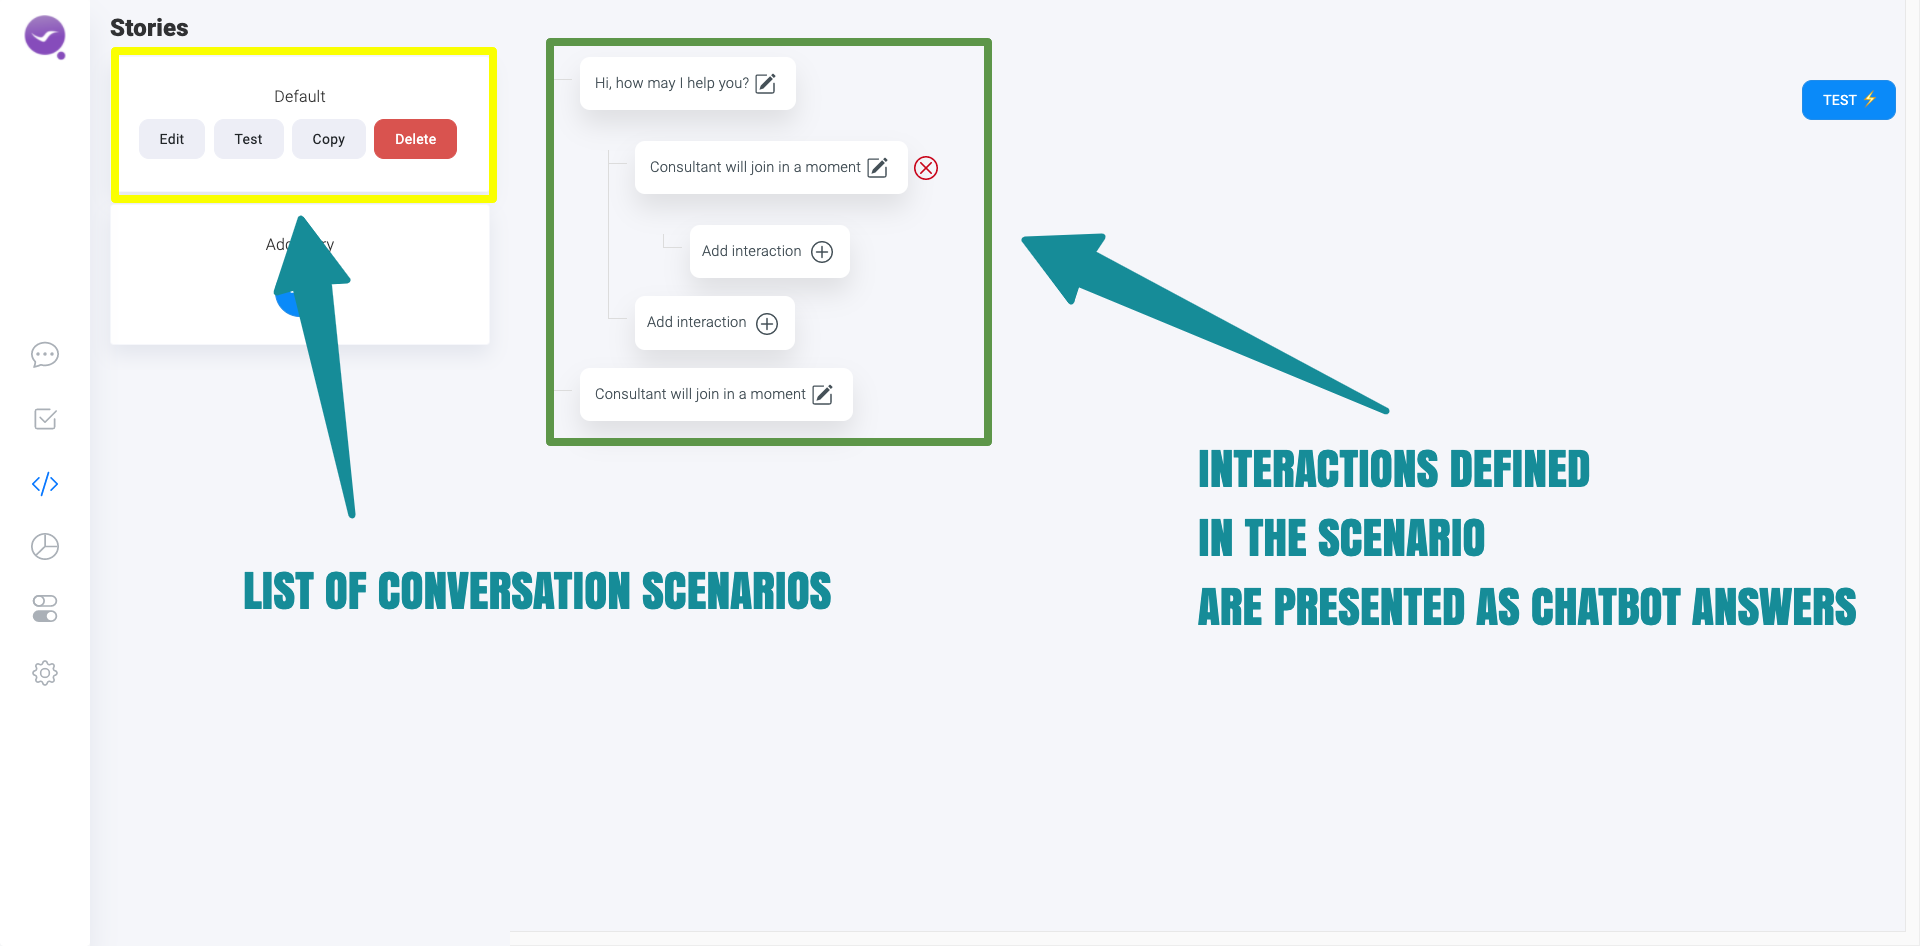
You can see a list of defined conversation scenarios marked yellow as on screenshot above, by unlimited plan you can have as much as you want. By clicking on “Edit” button, you will see a tree of defined interactions presented as chatbot answers. You can edit a defined answer or add a new one. When customer answer meet a specific conditions we will define in the next step, he will be answered by chatbot answer that also meet those conditions. In above scenario, conversation could look like this, customer says “Hi”, chatbot will answer “Hi, how may I help you?”, customer responds – “Wanted to ask if you have this X product in stock?” – chatbot answers – “Consultant will join in a moment”.

By following a path a branch of the tree, customer will be provided with all answers.

In the next step we will define what customer could ask and what chatbot might answer to those questions.

Step 2

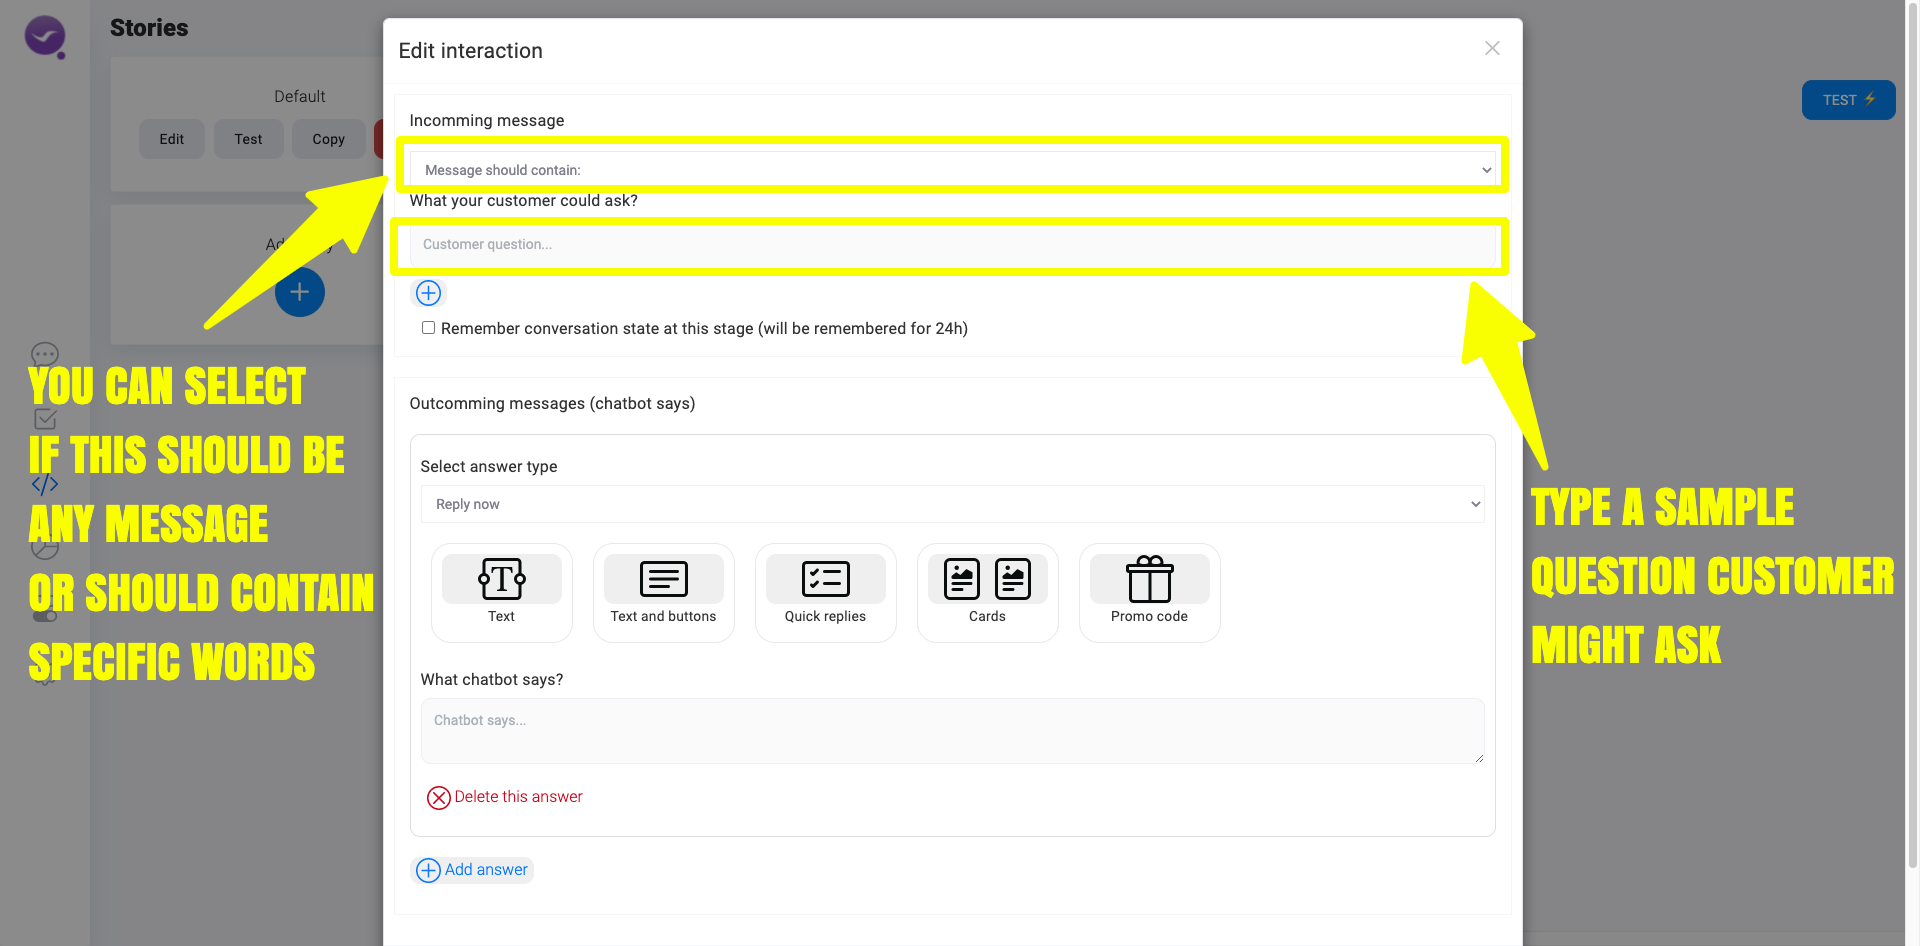
First define what is the type of an incomming message, should this chatbot answer be for all incomming messages, or just messages containing specyfic words. Next provide a question customer might ask, or provide just a list of comma separated list of the keywords.

In the next step let’s discuss what you can do answering your customer.

Step 3

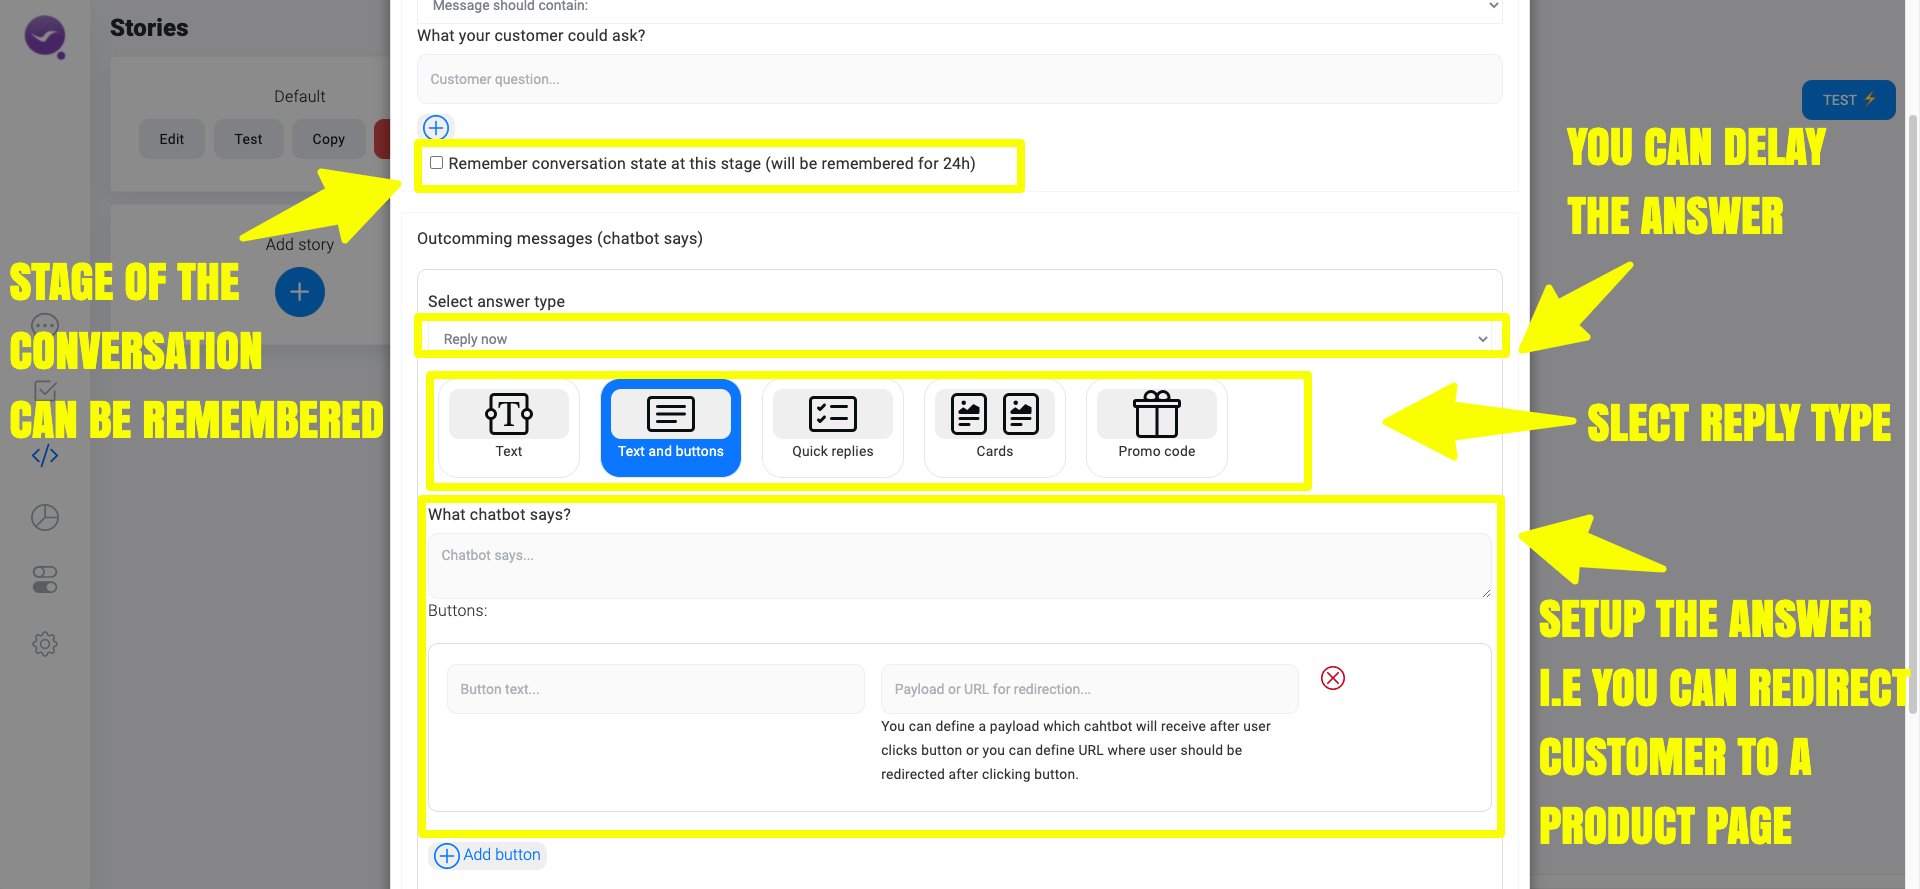
Option 1. Let’s imagine customer asked you – “how long I will be waiting for the delivery” – you can answer by providing a text response.

Option 2. Imagine that customer asked you – “Do you have a Roller blades available?” – You can present him a link to a desired product page by providing a button (text with the URL hidden) where he can find all the details.

Option 3. You were thinking about a quiz question that customer can solve in order to get a discount. You can use the “quick replies” to propose customer possible answers to the quiz, so at the end he can receive a discount code.

You can add up to 3 buttons and up to 10 quick replies.

By defining a button or a quick reply you can use it’s payload as an input (Incomming message) to another conversation step.

Of course there are many more possible ways of using ChatMyBot. We’ve presented only a few, we leave other options for your creativity.

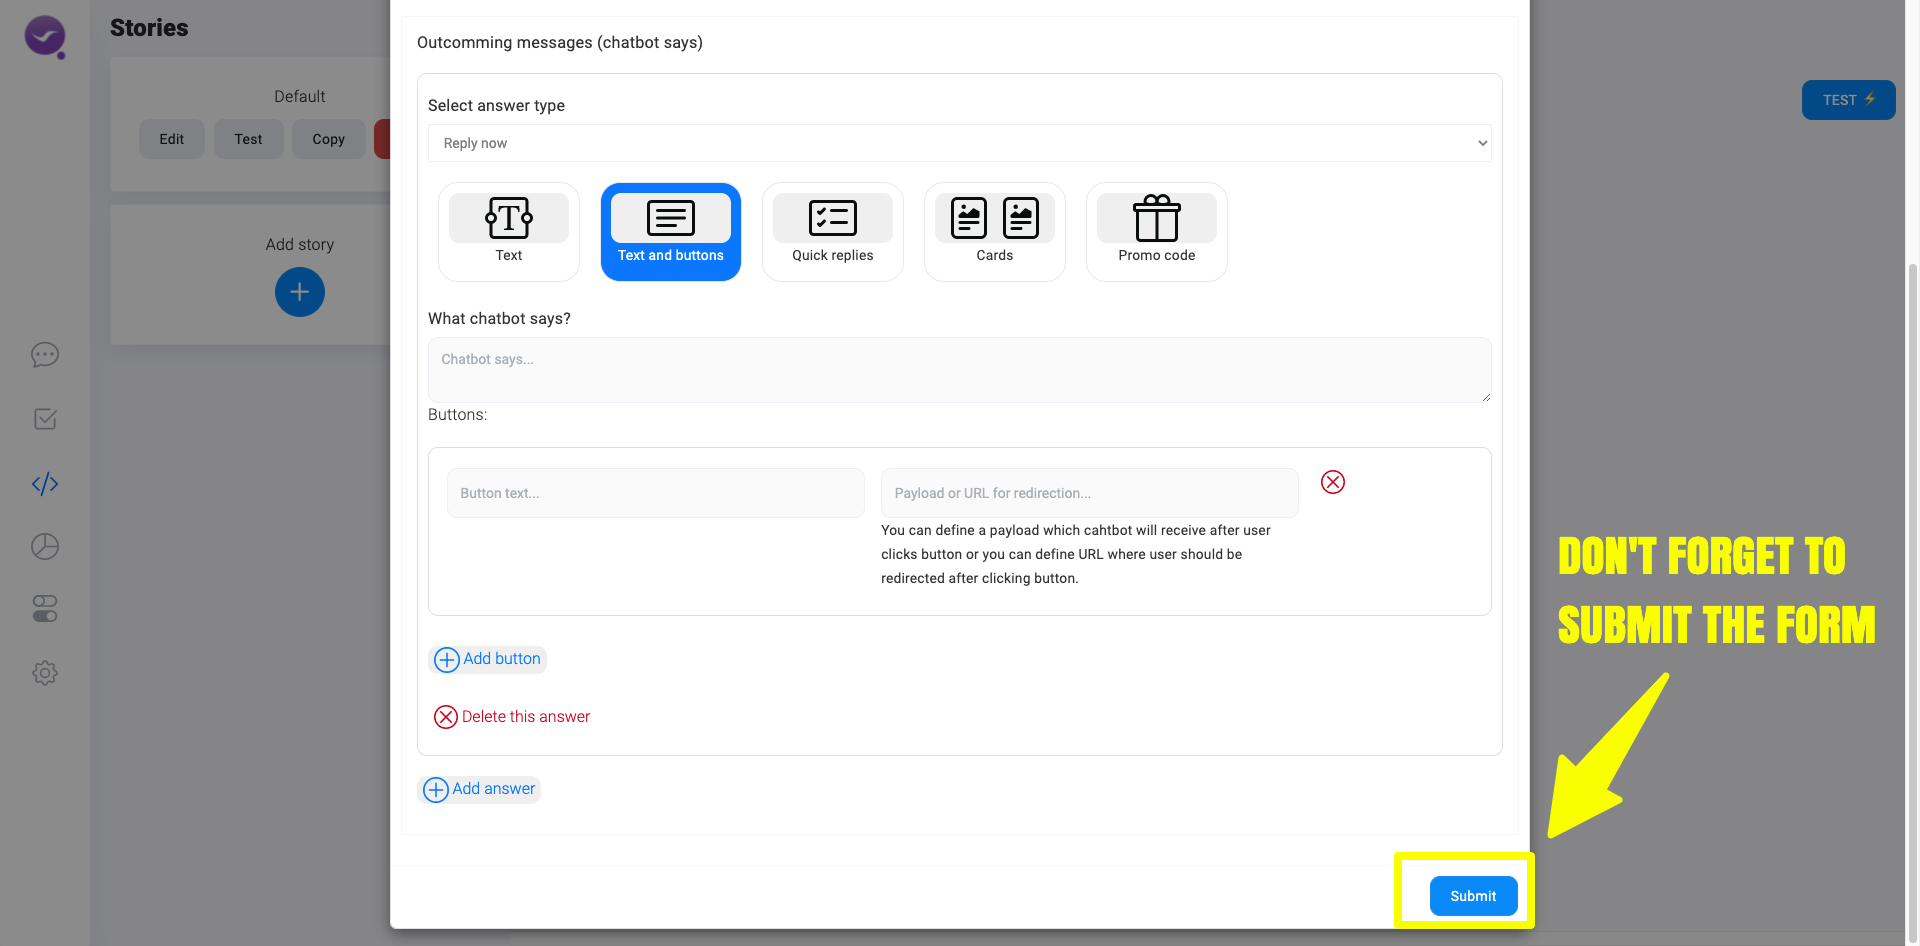
Once you have finished with creating the answer scroll down and submit the form.

Have more questions? Don’t hesitate to ask us: facebook.com/chatmybot or contact@chatmybot.com

ChatMyBot enabled Shopify integration

Shopify is a leading ecommerce platform, that’s why we enabled Chatmybot Live Chat & Chat bot integration with Shopify.

You can simplify your customer service by adding answers to most common questions on your chat, even questions about order statues will be answered by chatbot.

Using ChatMyBot you can do a quick quiz to lead customer to buy your product or service.

How to integrate ChatMyBot – Live chat and Chatbot with Shopify? With this 5 simple steps you will be able to get your customer service on a higher level:

  1. If you already have a Shopify store to go to https://apps.shopify.com/chatmybot-livechat-chatbot and click “Add app”
  2. You will be redirected to the permission page, please grant the permission and proceed
  3. Wait until Shopify is fully integrated with chatmybot.com after that enable the integration, to show the chat icon on your store front

4. If your chat plugin is still not visible on your store front, then go back to app.chatmybot.com/backoffice/connect select your integrated store from the right side menu check “on” enable chat widget checkbox, then submit.

5. Your chat widget should now be visible on your store front. If you want to check your conversations go to the conversation list, click on interesting conversation and start typing

How to set up a Campaign in ChatMyBot

Campaigns are an integral part of ChatMyBot and is a feature that can be used to re-engage with previous customers, winning repeat business or to engage those who showed interest but didn’t end up booking an appointment with you.

Building a Campaign is simple and requires only a couple steps to configure:

Under Dashboard and Campaigns press ‘Create Campaign’


Step 1:Create a Campaign Name. 

Make it something that is descriptive so that you can re-use the campaign in the future. Example: Short Hair/Long Hair/Dyed Hair/Straight Hair/Holiday Special etc.

Step 2: Choose A campaign type! 

ChatMyBot has two types of campaigns: Lead Collection; Sending Messages. 

Sending messages is a marketing blast. It can be used to for special offers or as marketing e-mail offering your services, which end up directly in the Facbeook inbox of your lead. Lead Collection is built around

The objective of lead collection is to engage the customer in a conversation and drive them to book an appointment with you. These campaigns are fully pre-defined conversation which can be defined under ‘stories’. Here, the end-customer will get a conversation hook in the webchat which tries to engage the customer and drive them to book and appointment.. Read more about creative conversation hooks here.

Step 3: Choose targeting Criteria for who to target in this campaign.. This is a vital step to prevent you from swamping your leads with information they don’t need and to improve the results of your campaigns. Creating tailored messages based on their needs and wants allows you to create a personal relationship with your leads and entice them to book an appointment with you immediately. Also, nobody wants to get marketing e-mails which aren’t relevant to the, so make sure you don’t spam your leads!

Step 4:
Step 4 varies based on if you want to send a message or if you want to collect leads or send a message blast.

Message Blast: Create a message, make it simple, quick for someone to read (remember, they are likely to read it on their phone) and to the point. You can also create Buttons, Quick Replies to questions, Images and Promo Codes!

Collect Leads: Define the goal of what stage you’d like the end-customer to reach.

Step 5:
Schedule the campaign to start now or in a later date.


Step 6:
Wait for the results! ChatMyBot provides with specific analytics to measure and iterate on your campaigns. Was a campaign successful? Easily iterate on your campaigns and optimize as you go!